
A Stay Home Guide To Hand-Sewing 101
Spending ample amounts of time at home has definitely found us getting our creative juices flowing. From making music, to crafting, to even putting together a 1000-piece puzzle, hobbies have definitely made a strong comeback.
So, we recently collaborated with bbatx committee member and artist Stephanie Page for a virtual workshop on one of their favorite hobbies and creative practices: sewing. Focused on the creative use and reuse of materials, Stephanie’s workshop demystified the experience of sewing and broke down the meditational aspects of mending one’s own clothing. They discussed how inspiration can be found all around you—both online and off—and how revamping your own clothing not only adds new value to it, but helps to avoid the waste of another garment in a landfill.
Read on to learn their hand-sewing basics if you’re looking to get crafty during quarantine.

ABOUT STEPHANIE PAGE:
Stephanie Page is an artist who is curious about the ways our clothing choices shape the world and our interactions with others. Born in Houston, Stephanie’s relationship with fashion and clothing goes way back, being a lifelong fashion lover and eco-conscious artist, in addition to having a professional background as an international fashion model and buyer in NYC. Stephanie has without a doubt seen the in’s and out’s of the retail manufacturing world, and they often find joy in making the old new again. You can usually find Stephanie in the studio creating costumes for stage or everyday life, concocting kitchen magic, or scooting around town or to the greenbelt. You can also connect with them on Instagram at @vividvoltage.
here are stephanie’s 7 hand-sewing basics:
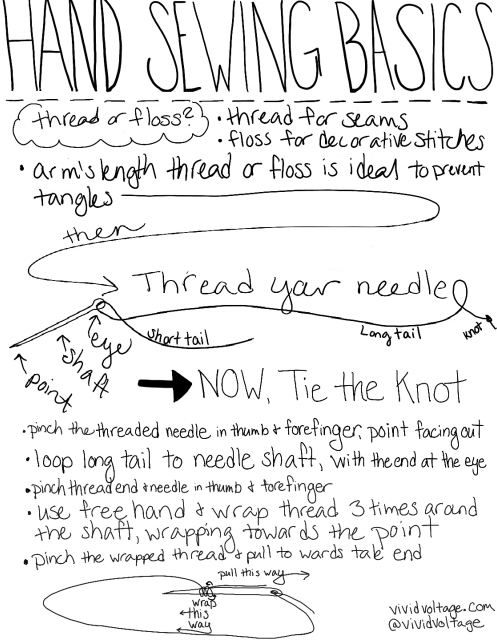
1.) Thread or Floss?
All you need to start hand-sewing are the basics, which you can easily score in the form of a beginner’s sewing kit during your next grocery store trip to HEB. Scissors, needles, and thread will do the trick. A good starting point is deciding which string of choice you’ll be using! Stephanie recommends polyester thread for seams, but you can easily use the dental floss in your bathroom for decorative stitches.
2.) Thread your needle and knot the thread.
To prevent tangles, get a piece of thread (or floss!) that’s the length of your arm, and then thread your needle through its eye (All parts of the thread and needle are labeled in Stephanie’s hand-drawn guide below).
Once you’ve threaded your needle, it’s time to tie the knot. Hold your threaded needle between your thumb and forefinger, with the needle’s point facing outward. Loop the long tail around the needle shaft, with the end at the eye of the needle.
Then, pinch the thread end and needle with your thumb and forefinger.
Use your free hand to wrap the thread three times around the shaft, wrapping towards the point.
Pinch the wrapped thread and pull towards the end of the needle, towards the eye. Voila! Your thread should now be knotted.
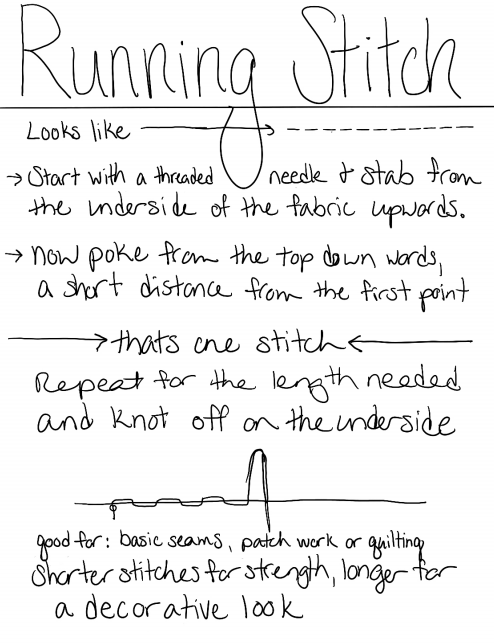
3.) HOW To: Make A RUNNING STITCH.
Running stitches are good for basic seams, patchwork, and quilting. You’ll want to use shorter stitches for strength and longer stitches for a decorative look. For a visual of what a running stitch looks like, see Stephanie’s hand-drawn guide below!
Start with a threaded needle and puncture your material from the underside of the fabric upwards.
Pull your thread through your material.
Next, from a short distance from that first point, poke from the top of your material downwards.
You’ve made your first stitch. :)
Repeat for the length needed and knot off on the underside.
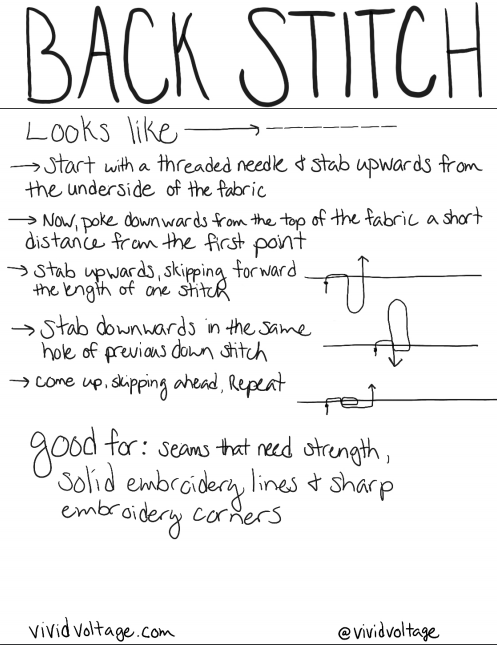
4.) HOW TO: MAKE A BACK STITCH.
Back stitches are ideal for solid embroidery lines, embroidery corners, and seams that need more strength. To see what they look like, see Stephanie’s hand-drawn guide below.
Start with a threaded needle and stab upwards from the underside of the fabric.
Next, poke downwards from the top of the fabric a short distance from the first point.
Stab upwards with your needle, skipping forward the length of one stitch.
Then, stab downwards in the same hole of the previous down stitch.
Come up, skip ahead again, and repeat.
5.) HOW TO: MAKE A WHIP STITCH.
Whip stitches are good for patches when trying to secure one to your material around its edges. See Stephanie’s visuals in their guide below.
Stab your needle upwards on the inside portion of the patch.
Bring your needle back down through your base material, creating a straight stitch about 1/8” long.
Repeat around the perimeter of your patch.
6.) HOW TO: PUT ON A BUTTON.
Cut a piece of thread that’s about twice the length of your arm.
Fold your thread in half and take hold of the center folding point of your thread. Thread this point through the eye of your needle, pulling the thread tails to equal lengths and knot.
Stab upwards through the fabric and button-hole, then down through another button-hole.
Repeat three times and knot off on the underside.
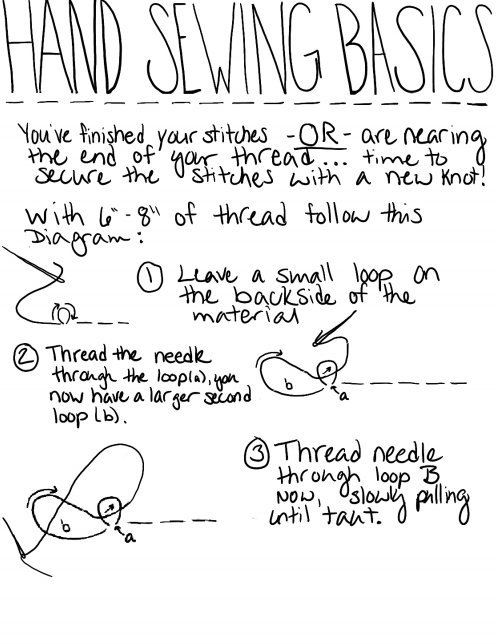
7.) The Important finishing step: SECURing YOUR STITCHES!
When you’ve finished your stitches or are nearing the end of your thread, it’s time to secure the stitches with a new knot. With 6-8” of thread or floss, follow these steps (and see Stephanie’s diagram below for a visual):
Leave a small loop on the backside of the material.
Thread your needle through this loop (loop A). You should now have a larger second loop (loop B).
Thread needle through your larger second loop (loop B), slowly pulling until taut.
You have successfully secured your stitches with a new knot. :)


Want more?
You can learn all of Stephanie’s helpful tips and tricks in their full art demo by gaining access to our STAY HOME CLUB Archive. If you previously RSVP’d for any of our April digital events, you should already have access to the password-protected archive page. If not, shoot us an email at thebabes@bosbabes.org. If you didn’t attend any of our STAY HOME CLUB e-vents, our complete archive is available for purchase for $10 at bossbabes.org/guides.